Let’s be real—mornings are a battlefield. The alarm blares, the clock is ticking, and the last thing you have time for is a complicated coffee ritual. But what if you could have that gloriously frothy, café-quality latte or cappuccino without the coffee shop price tag or the time suck? That’s where these game-changing Milk Frother Hacks For Busy Mornings come in. Forget lackluster instant coffee; we’re about to turn your chaotic morning into a moment of pure, caffeinated bliss, all in under 60 seconds.
What’s the Big Deal with a Milk Frother Anyway?
Think of a milk frother as your personal barista, a magic wand that transforms ordinary milk into a velvety, cloud-like foam. This isn’t just about looks; aerating the milk releases its natural sweetness and creates a luxuriously smooth texture that completely elevates your drink. For anyone who craves that coffee shop experience at home, a milk frother isn’t a luxury—it’s an essential tool for a better morning.
It’s the bridge between a sad, flat coffee and a soul-warming masterpiece. And the best part? It’s faster than waiting for your toast to pop.
Choosing Your Weapon: A Quick Guide to Milk Frothers
Not all frothers are created equal, and the right one for you depends on your lifestyle, counter space, and coffee ambitions. Let’s break down the main contenders.
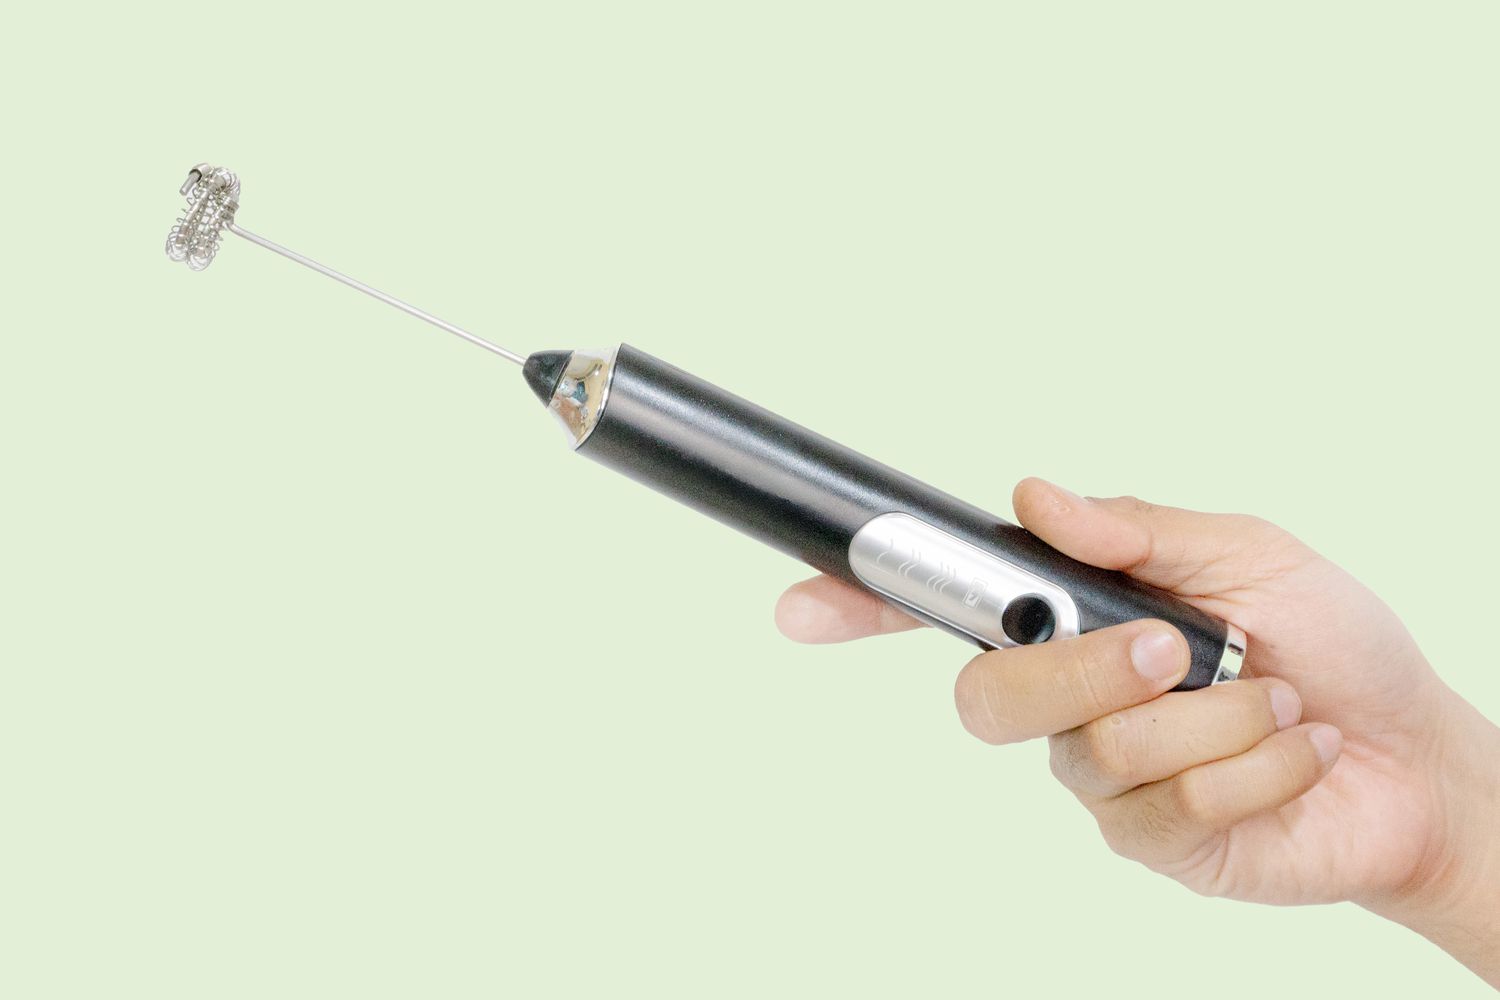
The Handheld Whisk: The Speed Demon
This is the quintessential tool for anyone looking for effective milk frother hacks for busy mornings. It’s a small, battery-powered wand with a whisk at the end. Simple, yet incredibly effective.
- Pros:
- Lightning Fast: Froths milk in 15-20 seconds.
- Super Affordable: Often the most budget-friendly option.
- Compact & Portable: Takes up virtually no space and you can even take it on trips.
- Easy to Clean: Just a quick rinse under hot water is all it takes.
- Cons:
- No Heating Element: You’ll need to warm your milk separately in the microwave or on the stove.
- Requires a Little Technique: You have to hold it at the right angle to get the best foam.
The Electric Frother: The Set-It-and-Forget-It Pro
This is a countertop jug that heats and froths your milk automatically with the press of a button. It’s the ultimate in convenience.
- Pros:
- All-in-One: Heats and froths simultaneously. Many models also have a cold froth setting.
- Consistent Results: Delivers perfect foam every single time, no technique required.
- Larger Capacity: Great for making multiple drinks at once for you and your family.
- Cons:
- More Expensive: A bigger investment than a handheld model.
- Takes Up Counter Space: It’s a small appliance you’ll need to store.
- More Involved Cleaning: Usually requires a more thorough wash.
The Manual Frother: The Artisanal Approach
A manual frother, or a French press-style frother, uses a plunger with a mesh screen that you pump up and down to aerate the milk.
- Pros:
- Excellent Control: You have complete control over the texture and density of the foam.
- No Electricity Needed: Perfect for camping, power outages, or a minimalist kitchen.
- Creates Silky Microfoam: Often praised for producing the best foam for latte art.
- Cons:
- Requires Effort: You are the motor! It takes about 30-60 seconds of vigorous pumping.
- Slower Process: You still have to heat the milk separately.
“The right milk frother doesn’t just make foam; it makes your morning routine seamless. It’s the single greatest bridge between home convenience and café craft.” – Clara Evans, professional barista and author of ‘The Home Brew Revolution’.
Your Ultimate Guide to Milk Frother Hacks for Busy Mornings
Alright, you’ve got your frother. Now, let’s make some magic. Here is the foolproof, no-fuss method to get perfect foam every time, even when you’re half-asleep.
- Choose Your Milk Wisely: This is the most important step. Whole milk froths beautifully due to its fat content. For non-dairy options, “barista blend” oat milk is the undisputed champion. It creates a creamy, stable foam that rivals dairy. Almond and soy can work, but results may vary.
- Get the Temperature Right: For a hot latte, the sweet spot is around 150°F (65°C). Don’t boil it! A quick 30-45 seconds in the microwave is usually perfect. If you overheat the milk, the proteins break down and it won’t foam properly.
- Don’t Overfill: Foam needs space to grow! Only fill your cup or frothing pitcher about one-third of the way full. Trust us on this one, or you’ll be cleaning up a milky volcano.
- The Frothing Technique (for Handheld Wands):
- Insert the whisk just below the surface of the milk.
- Turn it on. You’ll see the volume start to increase immediately.
- Slowly lower the wand toward the bottom of the cup. This incorporates the foam and froths the rest of the milk, creating a uniform, velvety texture.
- Turn it off before you pull it out of the milk to avoid a Jackson Pollock-style splatter on your kitchen wall.
- Pour Like a Pro: Tap the cup on the counter a couple of times to get rid of any large bubbles. Give it a gentle swirl. Pour the hot milk into your espresso or strong coffee, holding back the foam with a spoon. Then, spoon the glorious foam on top.
|
Our Picks for the Best Milk Frother in 2026
As an Amazon Associate, we earn from qualifying purchases.
|
||
| Num | Product | Action |
|---|---|---|
| 1 | Maestri House Rechargeable Milk Frother with Stand, LunaFro Handheld Electric Foam Maker Waterproof Detachable Stainless Steel Whisk Drink Mixer Foamer for Lattes, Cappuccino |

|
| 2 | Milk Frother Handheld Battery, Electric Foam Maker Frother Wand, Drink Mixer with Stainless Steel Whisk for Coffee, Matcha, Lattes, Cappuccino Black |
|
| 3 | Zulay Kitchen Powerful Milk Frother Wand With 2 Duracell Batteries - Ultra Fast Handheld Drink Mixer - Electric Whisk Foam Maker for Coffee, Lattes, Cappuccino, Matcha, Hot Chocolate & Creamer - Black |
|
| 4 | Powerful Milk Frother Wand - Mini Handheld Milk Frother with Stainless Steel Whisk - Battery-Powered Drink Mixer for Coffee, Lattes, Cappuccinos, Matcha - Coffee Enthusiasts Gift - Black |
|
| 5 | Zulay Kitchen Milk Frother Wand Drink Mixer with AA Duracell Batteries- Durable Handheld Milk Frother Electric Whisk - Easy-Clean Milk Frother Wand & Mini Blender - Electric Coffee Frother - Black |
|
| 6 | Maestri House Rechargeable Milk Frother, LunaFro Mini Handheld Electric Foam Maker Detachable Stainless Steel Whisk Drink Mixer Foamer Mini Blender for Matcha, Lattes, Cappuccino, No Stand |
|
| 7 | Milk Frother Handheld Rechargeable, Frother Wand Drink Mixer Electric Whisk for Coffee, Detachable With 3 Stainless Whisks, Hand Mixer for Lattes, Cappuccino, Matcha, Egg, No Stand, Black |
|
| 8 | Bean Envy Milk Frother Handheld for Coffee - Mini Drink Mixer Whisk & Coffee Foamer Wand with Stand for Lattes, Cappuccino, Matcha and Hot Chocolate - Kitchen Gifts - Black |
|
| 9 | YUSWKO Black Handheld Milk Frother Wand for Coffee, Rechargeable Electric Whisk with 3 Heads 3 Speeds Drink Mixer Coffee Frother For Latte, Cappuccino, Hot Chocolate, Egg |
|
| 10 | Milk Frother Handheld for Coffee (Foam Maker) Whisk Drink Mixer for Lattes, Cappuccino, Frappe, Matcha, Hot Chocolate |
|
What’s the Best Milk for Frothing?
The short answer: milk with higher protein and fat content creates the richest, most stable foam. Whole dairy milk is the gold standard. For plant-based alternatives, barista-edition oat milk is your best bet, as it’s specifically formulated with oils and emulsifiers to create a fantastic froth.
Beyond the Latte: Other Quick Uses for Your Frother
Your milk frother is more than a one-trick pony. It’s a versatile kitchen gadget that can seriously upgrade your beverage game.
- Matcha Lattes: Forget clumpy, poorly mixed matcha. Add a scoop of matcha powder and a little hot water to your cup, then use your frother to whisk it into a smooth, vibrant paste before adding your frothed milk.
- Luxury Hot Chocolate: Mix cocoa powder, a little sugar, and a splash of milk into a paste. Use the frother to blend it smooth, then top with your hot, frothed milk. It creates an incredibly rich and airy hot chocolate.
- Dalgona Coffee (Whipped Coffee): Your handheld frother can whip up instant coffee, sugar, and hot water into that famous fluffy coffee cloud in under a minute.
- Emulsifying Salad Dressings: Yes, really! Use it to quickly whip oil and vinegar into a perfectly emulsified vinaigrette.
How Do I Clean My Frother Quickly?
This is the ultimate busy-morning hack. For a handheld frother, simply fill a glass with hot, soapy water, insert the whisk, and turn it on for 10 seconds. Rinse and you’re done. For electric frothers, rinse them out immediately after use before the milk residue dries. Most have a non-stick interior, making a quick wipe with a sponge all you need.
Frequently Asked Questions (FAQ)
Q: Can I use a milk frother with cold milk?
A: Absolutely! Most electric frothers have a dedicated cold foam setting, which is perfect for iced lattes and cold brew. With a handheld frother, you can easily froth cold milk straight from the fridge for a refreshing treat.
Q: Why isn’t my milk frothing properly?
A: The most common culprits are the type of milk (low-fat or some non-dairy milks struggle), the temperature (if it’s too hot), or your milk not being fresh. Always use fresh, cold milk as your starting point.
Q: Which type of milk frother is the fastest for a busy morning?
A: The handheld wand frother is the undisputed speed champion. It can create foam in as little as 15 seconds. Combined with a quick microwave warm-up, the entire process from milk to foam is well under a minute.
Q: Is it worth getting a frother just for one person?
A: Definitely. The small investment pays for itself quickly when you consider the cost of daily coffee shop visits. A simple handheld frother is an inexpensive way to bring a little bit of luxury and joy to your solo morning routine.
Q: Can I make latte art with a milk frother?
A: Yes, but it takes practice! For the best results, you’ll want to create “microfoam”—a silky, paint-like texture with no visible bubbles. Manual or high-end electric frothers are generally better for this, but with the right technique, you can achieve it with a handheld frother too. Check out some tutorials on [how to pour basic latte art]!
Your New Morning Ritual Awaits
Embracing these Milk Frother hacks for busy mornings is about more than just making a better cup of coffee. It’s about reclaiming a few precious moments for yourself, starting your day with something that feels special, and proving that you don’t need to sacrifice quality for convenience. So go ahead, grab that frother, and give your morning coffee the glow-up it deserves. You’ll be amazed at how such a small tool can make such a big difference.