Ever look at that perfect, pillowy cloud of foam on a coffee shop cappuccino and wonder, “Why can’t I do that at home?” You’ve got the milk frother, you’ve got the coffee, but your foam ends up either disappointingly thin or like a bubbly science experiment. The secret isn’t in some magical machine; it’s in the technique. This guide is your new playbook on How To Adjust Froth Thickness, turning you from a home-brewing hopeful into the master of your morning coffee. We’re going to dive deep into the simple, game-changing adjustments that will let you create everything from silky, paint-like microfoam for latte art to a rich, dense cap for a classic cappuccino.
Why Does Froth Thickness Even Matter?
Before we get into the “how,” let’s talk about the “why.” Isn’t foam just foam? Not at all. The texture and density of your frothed milk dramatically change the entire coffee-drinking experience.
- For the Cappuccino Lover: You want a thick, airy, and stable foam. This “dry foam” creates a distinct layered effect, where you first taste the rich foam, followed by the hot espresso and milk beneath. It’s all about that luxurious, cloud-like texture.
- For the Latte Artist: You need the opposite. A perfect latte requires “microfoam”—a silky, velvety-smooth texture with bubbles so small they’re invisible to the naked eye. This “wet foam” integrates seamlessly with the espresso, creating a creamy, uniform drink that’s the perfect canvas for pouring latte art.
Understanding how to adjust froth thickness gives you the control to craft the exact drink you’re craving.
The Core Factors That Control Your Froth Thickness
Achieving the perfect froth isn’t about one single trick. It’s a combination of four key elements working in harmony. Master these, and you’ll master your milk frother.
It All Starts with the Milk: Your Froth’s Foundation
The type of milk you use is arguably the most critical factor. The magic ingredient for foam is protein. When you introduce air into the milk, the proteins unravel and form a stable structure around the air bubbles.
- Dairy Milk: Whole milk is the undisputed king for rich, creamy, and flavorful foam due to its ideal balance of protein, fat, and sugar. Skim milk, while lower in fat, has a high protein concentration, allowing it to create a very stiff, dry foam, though it can sometimes taste less luxurious.
- Non-Dairy Milk: This is where things get tricky. Many almond and rice milks are too low in protein to create stable foam. For best results, always look for a “barista blend” of your favorite non-dairy milk (oat milk is a current favorite for a reason!). These are specially formulated with added proteins or stabilizers to froth just like dairy milk.
The “Goldilocks Zone”: Why Milk Temperature is Crucial
You must start with cold milk. Period. The ideal starting temperature is straight from the fridge, around 40°F (4°C).
Why? Frothing is a race against time. You are trying to incorporate air (aeration) and break down large bubbles into a smooth texture (emulsification) before the milk gets too hot. Cold milk gives you a longer window to work your magic. Once milk heats past 140°F (60°C), the proteins start to break down and lose their ability to hold a stable structure. Your foam will collapse in on itself.
Your Frother Type: The Tool for the Job
The device you’re using will dictate your technique. Each type introduces air differently.
- Handheld Frothers: These battery-operated wands are fantastic for control but require the most technique. You are manually controlling the depth and angle of the whisk.
- Automatic Electric Frothers: These countertop jugs do most of the work for you. They heat and froth simultaneously, often with different whisk attachments for different foam styles.
- Manual Frothers: These typically use a French press-style plunger. They are simple and effective, relying on your manual pumping action to create foam.
Technique and Time: The Human Element
This is where you, the home barista, come in. How long you froth and where you position the frother are the final, crucial variables. This process is a two-step dance:
- Aeration (Adding Air): This is the stretching phase where you introduce air to create volume. This creates the big bubbles.
- Texturing (Creating Silkiness): This is the spinning or mixing phase where you create a vortex to break those big bubbles down into a uniform, silky microfoam.
The secret to adjusting froth thickness is balancing the time you spend on each of these two steps.
How to Adjust Froth Thickness with Your Specific Frother
Ready to get practical? Here’s the step-by-step breakdown for each frother type.
Mastering the Handheld Frother
This is all about finesse and feel. With a little practice, you’ll be pouring like a pro.
- Get Set Up: Pour your cold milk into a tall pitcher or mug, filling it no more than one-third full to leave room for expansion.
- The Initial Plunge: Insert the frother wand deep into the milk, near the bottom, and turn it on.
- Aerate for Thickness: Slowly raise the whisk head until it’s just kissing the surface of the milk. You’ll hear a slight “hissing” or “tearing” sound. This is the sound of air being pulled in.
- For Thick, Cappuccino-Style Foam: Keep the whisk near the surface for 15-20 seconds to incorporate a lot of air. You’ll see the volume grow significantly.
- For Thin, Latte-Style Foam: Only keep the whisk near the surface for 5-7 seconds. You just want to introduce a little bit of air.
- Texture for Smoothness: Once you’ve added enough air, submerge the whisk deeper into the milk, angling it slightly to create a whirlpool or vortex. Keep it submerged until the milk has reached your desired temperature (around 140°F/60°C) and has a glossy sheen. This step breaks down the big bubbles into that silky microfoam.
- Finish: Turn the frother off before you remove it from the milk. Give the pitcher a firm tap on the counter to pop any remaining large bubbles and a gentle swirl to perfect the texture.
Taming the Automatic Electric Frother
These devices simplify the process, but you still have choices that affect the outcome.
- Choose the Right Whisk: Most automatic frothers come with two attachments. One is a serrated or coiled whisk designed for maximum air incorporation (for cappuccinos). The other is a smooth disc designed for gentle heating and minimal frothing (for lattes or flat whites).
- Mind the Fill Lines: These frothers have a “Max Froth” line and a “Max Heat” line. For the thickest foam, fill to the lower “Max Froth” line. Overfilling will prevent the milk from circulating properly and limit its ability to expand.
- Select the Right Setting: Some advanced models have different settings for cold foam, thick hot foam, and thin hot foam. Experiment with these to see which one delivers your perfect result.
|
Our Picks for the Best Milk Frother in 2026
As an Amazon Associate, we earn from qualifying purchases.
|
||
| Num | Product | Action |
|---|---|---|
| 1 | Milk Frother Handheld for Coffee (Foam Maker) Whisk Drink Mixer for Lattes, Cappuccino, Frappe, Matcha, Hot Chocolate |

|
| 2 | Zulay Kitchen Milk Frother Wand Drink Mixer with AA Duracell Batteries- Durable Handheld Milk Frother Electric Whisk - Easy-Clean Milk Frother Wand & Mini Blender - Electric Coffee Frother - Black |
|
| 3 | Maestri House Rechargeable Milk Frother with Stand, LunaFro Handheld Electric Foam Maker Waterproof Detachable Stainless Steel Whisk Drink Mixer Foamer for Lattes, Cappuccino |
|
| 4 | Bean Envy Milk Frother Handheld for Coffee - Mini Drink Mixer Whisk & Coffee Foamer Wand with Stand for Lattes, Cappuccino, Matcha and Hot Chocolate - Kitchen Gifts - Black |
|
| 5 | Zulay Kitchen Powerful Milk Frother Wand With 2 Duracell Batteries - Ultra Fast Handheld Drink Mixer - Electric Whisk Foam Maker for Coffee, Lattes, Cappuccino, Matcha, Hot Chocolate & Creamer - Black |
|
| 6 | Milk Frother Handheld Battery, Electric Foam Maker Frother Wand, Drink Mixer with Stainless Steel Whisk for Coffee, Matcha, Lattes, Cappuccino Black |
|
| 7 | Milk Frother Handheld Rechargeable, Frother Wand Drink Mixer Electric Whisk for Coffee, Detachable With 3 Stainless Whisks, Hand Mixer for Lattes, Cappuccino, Matcha, Egg, No Stand, Black |
|
| 8 | Maestri House Rechargeable Milk Frother, LunaFro Mini Handheld Electric Foam Maker Detachable Stainless Steel Whisk Drink Mixer Foamer Mini Blender for Matcha, Lattes, Cappuccino, No Stand |
|
| 9 | Powerful Milk Frother Wand - Mini Handheld Milk Frother with Stainless Steel Whisk - Battery-Powered Drink Mixer for Coffee, Lattes, Cappuccinos, Matcha - Coffee Enthusiasts Gift - Black |
|
| 10 | YUSWKO Black Handheld Milk Frother Wand for Coffee, Rechargeable Electric Whisk with 3 Heads 3 Speeds Drink Mixer Coffee Frother For Latte, Cappuccino, Hot Chocolate, Egg |
|
The Manual Method: Using a French Press
Don’t underestimate this low-tech hero. It can produce surprisingly great foam.
- Heat Your Milk: First, gently heat your milk on the stove or in the microwave to about 140-150°F (60-65°C). Don’t let it boil.
- Pour and Plunge: Pour the warm milk into your French press, filling it no more than halfway. Place the lid on and rapidly plunge the filter up and down.
- For Thicker Foam: Plunge for a longer duration, about 60 seconds. More plunges equal more air and more volume.
- For Thinner Foam: A shorter, quicker plunge of about 30 seconds will be sufficient.
- Settle and Swirl: Let the foam rest for a minute to stabilize, then tap and swirl just like you would with other methods.
Pro Tips from Behind the Coffee Bar
Want to take your skills to the next level? Here are a few tricks we use in the biz.
“The final texture of your milk is made after the frothing is done. Never underestimate the power of a good tap and swirl. It’s what separates good foam from great foam.” – Isabella Rossi, Barista Champion
- Use a Proper Frothing Pitcher: A stainless steel pitcher with a spout isn’t just for show. The metal helps you gauge the temperature by touch, and the spout is essential for pouring with precision, especially for latte art.
- Groom Your Milk: After frothing, always give the pitcher a couple of firm taps on the counter. This helps to pop any large, ugly bubbles. Follow this with a gentle swirl of the pitcher to integrate the foam and milk, giving it a beautiful, glossy, wet-paint-like texture.
- Practice, Practice, Practice: Your first few attempts might not be perfect. Don’t be discouraged! Learning how to adjust froth thickness is a skill, and like any skill, it improves with practice.
Frequently Asked Questions
Q: What is the absolute best milk for getting the thickest froth?
A: For dairy, fresh, cold whole milk is the champion. For non-dairy, a barista-blend oat milk will give you the creamiest and most stable thick foam due to its higher fat and protein content compared to other plant-based milks.
Q: Can you make milk froth too thick?
A: Absolutely. This is often called “dry foam,” and it looks more like meringue. It’s very stiff, doesn’t pour well, and sits on top of the coffee like a separate entity rather than integrating with it. You achieve this by aerating for too long.
Q: Why won’t my almond milk froth properly?
A: Standard almond milk is notoriously difficult to froth because it has very low protein and fat content. The protein structure simply isn’t strong enough to hold the air bubbles. Always opt for a “barista series” almond milk, which has added ingredients to help it perform like dairy milk.
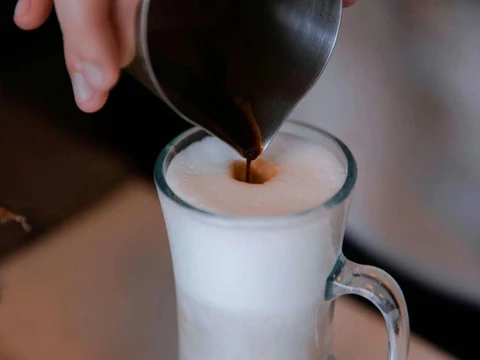
Q: How do I get that silky microfoam for latte art?
A: The key to microfoam is to minimize the aeration stage (just a few seconds of hissing) and maximize the texturing stage. You want to create a smooth, spinning vortex that breaks down all the bubbles until the milk looks like glossy, wet paint.
Q: Does the power of a handheld frother affect froth thickness?
A: Yes, it can. A more powerful frother will incorporate air much faster. This means you may need to shorten your aeration time to avoid creating overly bubbly foam. It’s all about learning the feel of your specific tool.
Mastering how to adjust froth thickness is your ticket to café-quality coffee at home. It’s the difference between a generic cup and a personalized beverage crafted exactly to your liking. By paying attention to the details—your milk choice, the starting temperature, and your specific technique—you unlock a new world of coffee creation. So go ahead, grab your frother, and start experimenting. Your perfect latte or cappuccino is waiting.